Over the summer I worked on a rather fun, surprise project.
The story starts with changing furniture in a room of our home. Afterwards there was a wall crying out for a large piece of art. Considering a few options, we settled on a metal photo print; Subject: beach, Photographer: me. Using painters tape as a guide, a 30" x 60" print looked to be the ideal size. Not having made a print larger than 24" x 36", I had a new challenge ahead.
The first decision was location. Fortunately we already had booked a trip to Puerto Rico. Plenty of gorgeous beaches there, so check off the location decision. The next question was how to acquire the high resolution image. Panoramic stitching or high resolution shot stacking was out because of wave motion in the beach scene. Safest bet was a single high-res photo, which made the next choice easy too. About a year prior I sold my Nikon D800e and f1.4 35mm Nikkor in favor of a Sony RX1R II with it's f2 35mm Zeiss. It was the best option in my kit for high resolution in a single, un-merged shot. And, the RX1R II's diminutive size meant it wouldn't be a bother to take along on all visits to any beach in Puerto Rico. The acquisition decision was settled, except...
Several weeks before our departure, Fujifilm discovered brand new and unopened GF670 medium format film cameras in their warehouse. The GF670 was introduced in 2008 and discontinued in 2014. Interesting ...the gears began to turn. I've never had the opportunity to shoot medium format film, it was fairly portable for a medium format camera, had a fixed 80mm lens (similar FOV as the fixed 35mm on the full-frame Sony), and we all know medium format is well suited for big enlargements. I gave in and purchased the camera with a few rolls of Provia 100F. I had a month to learn how to use the GF670 before our trip. On a sunny spring day, I set out on my first shooting test along the Point Reyes National Seashore.

Fujifilm GF670 and Provia 100fF Fujinon ECB 80mm, f8 @ 1/400th
Curious to see how the 42 Mpix Sony RX1R II compared to medium format film, I packed it in the bag with the GF670. In the field I captured a photo with the tripod mounted GF670 and then swapped it with the RX1R II. After I got the film back from the lab, I scanned it on my Epson V500 Photo. Opening the first film scan and the matching Sony RAW file, I was surprised. The 6x7 film was noticeably less sharp. Did I make a mistake labeling the files? I opened a few other scans up and saw the same. The Sony RAW files had more detail. This is when I learned something important about flatbed photo scanners. The specs may list the highest step resolution of the scanner, but does not tell the whole story when it comes to optical performance. For more information I highly recommend the German site ScanDig. It turns out my V500 Photo, rated as a 6400dpi scanner, effectively performs at much lower resolution on transparencies. Wow, this would not do. ScanDig rated the Imacon scanner as the highest performer. I found a local lab that had one and took the film there to be rescanned.
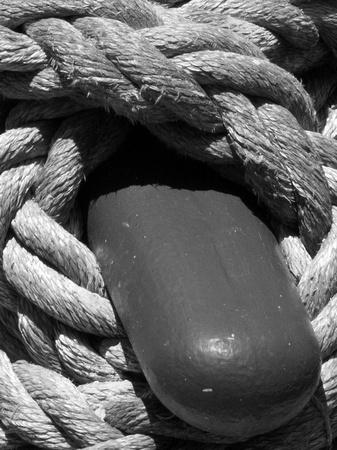
Again, I was surprised. The 9827 × 7992 Imacon scans were much better than the V500 Photo scanner output. But across all shots compared, the film scans were not demonstrably better than the RX1R II's 7072 × 5304 RAW files. Below is an example crop from the frame above, in monochrome.


Fujifilm GF670, 6x7 Provia 100F Imacon scan Sony RX1R II, 42mpix at 100 iso
Now, I realize there are a few factors to consider in this outcome. Provia 100F is an extremely fine grained color film and I could have chosen an even finer grained film like Velvia 50. I was looking for more faithful color response though and that made Provia 100F the better choice. Since I wanted to compare the two cameras and formats, there were shutter speed and depth of field differences to contend with. I selected an aperture that struck a balance between lens sharpness sweet spot and suitable DoF for the image, while keeping the digital camera out of diffraction, and letting the shutter speed fall at or below the 1/500th maximum on the GF670. On the example image above the aperture setting was f8. This meant the Sony's hyperfocal distance was 28ft with a DoF of 14ft. to infinity while the Fujifilm's hyperfocal distance was 44ft, giving a DoF of 22' to infinity. Setting the same distant focus point on both cameras insured that everything from the mid-ground to the background was indeed in focus. Finally, it's possible the optical quality of the Fujinon 80mm lens may not be quite as good as the Zeiss 35mm, but I have no way to effectively confirm that.
Certainly this is not a lab test. There may be ways to extract more detail from a 6x7 film frame. Still, more than reasonable care was taken in shooting and processing these images. A sturdy tripod and cable release was used on a calm day, exposure settings were carefully considered, focus was precisely set, and the film was digitized on a $25,000 scanner. Even if there was any more precision that could be added, it would add cost, bulk, or be cumbersome to the point of being impractical. Between these two small high resolution camera systems, for me it was clear. Given the goals/constraints of portability, image fidelity, and cost, the 42 Mpix Sony RX1R II beat out the medium format Fujifilm camera. Final decision rendered. It was time to pack.
The RX1R II worked out great on the trip. Having a very compact, high resolution camera always handy allowed me to take many photos at several beach locations. The volume of shots meant there were more selects from which to choose. After a few small test prints, the final 60" x 30" metal print was completed at Bay Photo Lab in late August. The wall is no longer blank and I'm very pleased with the results.

luquillo beach, puerto rico
sony rx1r II, zeiss sonar f2 35mm
]]>
In the last of the series, I wrote about being thrilled to have found a classic Olympus camera in Japan, the 1963 PEN-F. My real hope though, was to acquire an icon from my youth, an OM-1 ...and I did. I found my OM-1 at Camera Naniwa, near the Kawaramachi Station, in Kyoto. Except for a small dent on the top of pentaprism enclosure, it was in very good condition. The store manager assured me the camera and the attached f2.8 g.Zuiko 35mm lens were both in perfect working condition. For only $120 USD, it became mine.
I enjoyed doing comparison shooting with the analog and digital PEN-F and decided to do the same with the OM-1 and OM-D. However, I thought I'd wait until I upgraded my OM-D EM-1 to the mkii model. I've had the EM-1 mkii for a while now and it was time to go out on a shoot with the past and present OM series cameras. First, a bit of history and background on why I like this camera series so much.
Following on the success of the PEN half-frame cameras, the full-frame 35mm OM-1 was the next act for Yoshihisa Maitani. Maitani's initial design parameters used earlier 35mm Leica rangefinders as a guide. Their compactness and quietness was considered an asset by Oscar Barnak, the father of the 35mm photography. Maitani, who shot with a Leica IIIf in his youth agreed. With that in mind, Maitani challenged the prevailing wisdom that SLRs had to be "big, heavy, and noisy". He felt Olympus should improve on contemporary designs, believing a small, light, and quiet professional SLR system would be an improvement on what was being offered by other manufacturers. Even now, this debate sounds all to familiar. Then as now, this was also not without it's marketing and technical hurdles. It took a while for Maitani to convince his colleagues that a compact SLR would be a market success. Once he did, it took a number of years to overcome the design challenges. In the end Maitani and his team created a mechanical masterpiece. My favorite story is the design of the shutter winding mechanism, which ultimately led to the speed selector being placed on the lens mounting ring. Brilliant thinking that provided a great user interface, adjusting shutter, aperture, and focus with one hand.
There are other interesting design stories, and if you're interested in learning more, I suggest reading the Unofficial Olympus OM Sales Information File and the Maitani-Olympus site.

Over the years Olympus has maintained their philosophy in designing small, light, and quiet professional cameras. Not factoring the grip on the OM-D EM-1, it is the same physical size as the OM-1, and therefore the same size as the Leica rangefinders that inspired Yoshihisa Maitani. The OM-D EM-1 is 13 grams lighter than the OM-1 and not only has a quiet shutter, but also a silent shutter mode. Olympus has done all this while continuing to advance the state-of-the-art of photography with new innovations, still packed into well designed small, professional cameras. Olympus was the first to develop a new Pro DSLR system with matching Zuiko lenses purpose built for digital sensors, first to introduce an ultrasonic cleaning system for sensor dust removal, first to embrace mirrorless camera bodies, first to provide in body image stabilization systems, currently working in 5 axis and able to sync with 2 axis stabilizers in Zuiko Pro telephoto lenses. One of the latest advancements on the OM-D EM-1 mkii is "Hi-Res Shot" mode. Using the in-body IS system, the camera captures multiple images then merges them into a single 50Mpix frame. I thought I'd base my OM-1 to OM-D comparison on this feature. Using the same rationale from my PEN-F test, again I loaded Kodak Portra 400 into the OM-1. On an sunny blustery afternoon, I set out to Fort Point to shoot with both cameras.


a few images from Fort Point, shot with the OM-1 and g.zuiko 35mm lens
 Golden Gate Bridge from Fort Point, OM-D EM-1 mkii, hi-res shot mode
The salesman in Kyoto was correct. The used OM-1 system was fully functional and yielded perfectly exposed and sharp images on the negative. Having learned about the limitations of my V500 during my 120 film test, I initially thought I'd have the film scanned on an Imacon scanner. A few weeks before though, I read about folks using sharp macro lenses on DSLRs to digitize negatives. I liked that idea. I have a m.Zuiko 60mm f2.8 macro and could do the scans at home for no additional cost. Once everything was setup on the light table, I set the EM-1 mkii to hi-res shot mode again, just as it was for the digital capture. Hence, the digitized film image would be 8160x5385, the same resolution as the digital capture. Below are 100% crops from the GG Bridge framing shown above.


Portra 400: Epson v500 @ 6400 dpi Portra 400: EM-1 mkii hi-res @ 50Mpix RAW iso 400: EM-1 mkii hi-res @ 50Mpix
Certainly the v500 is not acceptable for precision scanning of full frame 35mm film. The digitized negative from EM-1 mkii is surprisingly good. So good that I don't think I'd ever bother scanning 35mm film on an Imacon. As you can see though, the digital capture from the EM-1 mkii is the cleanest and the sharpest.
In the end, I enjoy having an OM-1 now and continue to marvel at it's design and technical achievement. But, it's the further evolved Olympus M, the OM-D EM-1 mkii that will continue to shoot with.
]]>
In the previous blog I mentioned the original OM-1. Before we get to that camera though, we're going to take a slight detour.
On our Japan trip I considered buying a camera or lens as a souvenir. It didn’t take long to discover what I now realize is common knowledge on the web. It's more expensive to buy new camera equipment in Japan than here in America. Hmm, what to do now? Browsing around in the cities, I saw that used film cameras in excellent condition were plentiful, and inexpensive. My souvenir dilemma was solved. Now, the question was, which vintage camera? The OM-1? Well...
Earlier in the year I acquired the new Olympus PEN-F Digital. Others have written on the design of this camera, so I won't go into that here. See "Olympus PEN-F Design Story: Timeless Enjoyment", by Aage Granaas if you'd like to read more. The reimagined 2016 "F" is based on the 1963 "F", which had all the hallmarks of great industrial design. It is a camera you want to pickup, hold, and use. Both then and now, photographers have been drawn to it. With that in mind, an original 35mm PEN-F became my souvenir of choice.
The hunt led me to a second visit of the Akihabara district in Tokyo; specifically the Akihabara Radio Center. It's a historic building that once was at the center of Japan's post-WWII "electric town". These days it's a rather unique, multi-floor, electronics bazaar, complete with a small shrine on the second level. Here is where I found a very clean and fully functional 35mm PEN-F with a F.Zuiko f1.8 38mm lens. Price? Only $150 USD, with a manual! While in Japan I continued to shoot with my digital cameras. Once home though, I was itching to try out the vintage PEN-F.


in the akihabara radio center... walking the asiles, down the stairs, shrine on second floor, selecting a 35mm pen-f

I was more interested in a practical comparison, so this would not be a typical "lab" test. With two similarly designed cameras from different eras, what would the results be shooting in the same conditions, without spending a lot of time on capturing and processing the resultant images? With those parameters in mind, I set out.
The first step was to create a reasonably level playing field. Setting both cameras at 400 ASA/ISO would be a good balance of speed and latitude. Since I wanted natural color reproduction, I chose Kodak PORTRA 400 color negative for the 35mm PEN and kept the digital PEN's color settings to "Natural". The choice of lenses was simple. I bought the vintage PEN-F with a 38mm f1.8, the "standard" 50mm equivalent lens for the 35mm half-frame format. On the digital PEN-F was the 25mm f1.8, having the same field of view on the micro four-thirds format. The original PEN-F from 1963 did not have a built-in light meter. So, for exposure on both cameras I used the digital PEN-F's ESP metering as a baseline and double checked it against a Lumu Lite. Finally, since these cameras are built for mobility, no tripods. All shots would be hand held. After that was settled it was time to go shooting


1963 Olympus PEN-F w/F.Zuiko 38mm, f11 @ 1/500th 2016 Olympus PEN-F digital w/M.Zuiko 25mm, f11 @ 1/500th
When I got the film back from the lab I was pleased to see that the vintage camera did indeed work. Most of the frames were quite useable. Though it was clear the film frames would require some work to linearize them against the files from the digital PEN-F. The digital PEN-F files received a basic Adobe RAW conversion and became the target to match the analog frames to. The negative was scanned on an Epson V500 at 4000 dpi. Once converted to TIFF, I made only simple exposure and tone curve adjustments, along with some slight cropping to match the negative captures to the digital. The example shown above was converted to monochrome, providing an easier comparison of sharpness, structure, and tone.
The final results were remarkably good. The film frame was able to be dialed in to match the digital frame quite well. Both cameras compared nicely in overall image quality and sharpness for small prints. However, pushing in a bit one can see the vintage system would not be well suited for large prints.

100% crop: 1963 Olympus PEN-F, Kodak portra 400 vs. 2016 Olympus PEN-F digital, 20 mpix live-mos at 400 iso
I was quite surprised when comparing color reproduction. In this area, optomechanical qualities play less of a role whereas the color science behind the film and digital processing do. With simple adjustments I was quickly able to get a good match of the PORTRA 400 negative to the digital PEN-F file. Aside from slight tone curve and saturation variations, and the sharpness difference exhibited in the monochrome comparison, the images are very close in look and feel.

1963 Olympus PEN-F, Kodak portra 400
2016 Olympus PEN-F digital, "natural" color, 400 iso
It was fun doing this comparison and and I've learned a lot in the process.
As expected, I enjoyed shooting with the original PEN-F. When loaded with contemporary film stock, this 50+ year old camera yielded very good results. In the final analysis though, the digital PEN-F is notably superior in sharpness, overall image quality, and ease of getting good results, quickly. I spent a fair amount of time getting the film images scanned and post-processed to achieve the final results. The digital frames were pretty much good to go as they were.
What was the shooting experience like with both cameras? Both felt wonderfully solid, well machined, and comfortable in the hand. Both strike a great balance between being small enough to be a convenient and unobtrusive tool, yet not too small as to be "fiddly". Interestingly, both weigh exactly the same at one pound and one ounce, with a "standard" lens. That's where the similarities end. I didn't realize how accustomed I've become so to the fast, flexible, and mostly accurate auto-focus systems we have on modern digital cameras. I would have missed shots with the original PEN-F where the digital PEN-F would have captured not one, but a few in-focus frames. Even comparing manual focus on both systems, I found it much quicker to find correct focus using the digital PEN-F's focus-zoom in the viewfinder, compared to the split-prism on the original PEN-F. The other limitation on the vintage camera was shutter speed. With 400 speed film, there were times when the top shutter speed of 1/500th caused me to pass on a shot. If it was 1963, I'd have an ND. Today with mechanical shutter speeds of 1/8000th, and 1/16000 electronic, I don't need to. I also missed having third stops on the aperture and shutter. Sometimes it was impossible to set optimum exposure using full-stops on the original PEN-F. Finally, there is the flexibility of being able to change the imager sensitivity, on each frame if need be. Can't do that on a camera loaded with 400 ASA film.
Is it fair to compare a 50 year old camera system to what we have access to today? No, not really. But with all the nostalgia of late, recalling the good-old-days of film, I though it would be interesting to reflect on how advanced our current equipment really is. I'm very pleased to have a bit of camera history in the souvenir PEN-F from Japan. The next time I'm out shooting though, it'll likely be with the digital PEN-F. However, when I am using it I'll be mindful how strikingly good the original PEN-F was and will a carry deeper appreciation for the advancements in the state-of-the-art realized in the current PEN-F.
]]>
Well, here goes. My first blog post. Much is written about photography and the tools of the craft, making it difficult to find a unique topic. Recently though, a trip to Japan and an unplanned purchase there led me to consider how Olympus's design vision has contributed to my photography.
Looking back, I realize I've been a fan of Olympus for quite some time. When I was young, I longed to have an OM camera. But as a teenager with limited means in the late 1970s, the hand-me-down Minolta SRT-101 had to do. It was a good camera and it's Rokkor 50mm f1.4 was a nice optic. The OM-1 seemed so much more desirable though. The efficiency of it's compact design was not only practical (the best photos come from the camera you have with you), but it also suggested a level of engineering elegance that I would later come to fully realize, and appreciate. Already endowed with Minolta gear, I continued to grow with that system during my film shooting years.
Fast forward to 2000, when a handful of digital cameras became affordable. That year a colleague let me borrow his Olympus C-2500L. In the hand it was small yet comfortable to handle. It offered a good deal of photographic control, was technically advanced for it's time, and it was reasonably priced. Most of all, in good light the image quality from this compact, 2.5 megapixel DSLR was remarkable. Nearly 2 decades later, I found myself once again drawn to Olympus and their design sensibility. A week after borrowing the C-2500L, I purchased one and began exploring the new realm of digital photography.


Olympus C-2500L OOC jpegs from Chicago Illinois, Merano Italy, and Alpbach Austria, 2000
That little camera drew me back into photography. It became the "camera I always had with me"; the realization of Olympus's original vision, now digital. Malcolm Gladwell writes it takes ten thousand hours of practice to achieve mastery in a field. The convenience of digital imaging has certainly helped me iterate quicker and improve my skills. But thanks to Olympus, having a compact, high quality camera nearby has had the greatest impact on fulfilling those hours towards mastery.
After the C-2500L, Olympus cameras remained the most at-hand part of my kit.
...Jim
]]>